CONNECT TO A DATABASE
DbSchema can access the database only if the JDBC Driver is installed on your computer.
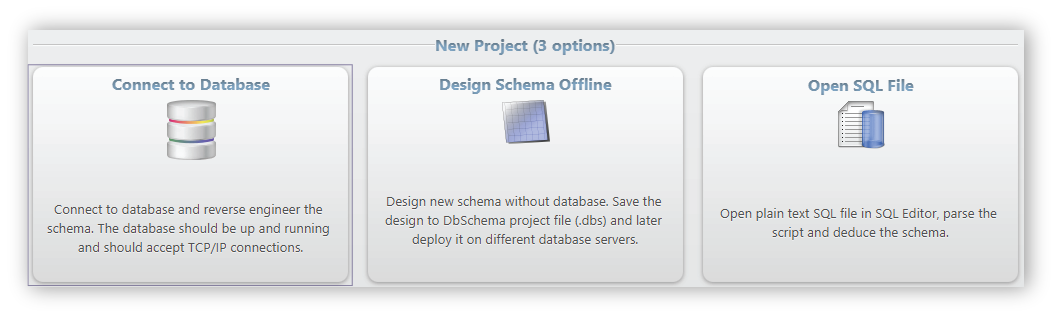
Start DbSchema and you will get the next dialog box. Choose Connect to Database
For this tutorial, we will connect to an H2 database, because it does not require any pre-installed software. For MySql, MariaDb, Postgresql, etc., the database software should be installed and configured as well. You can find more information about databases and how to connect here.
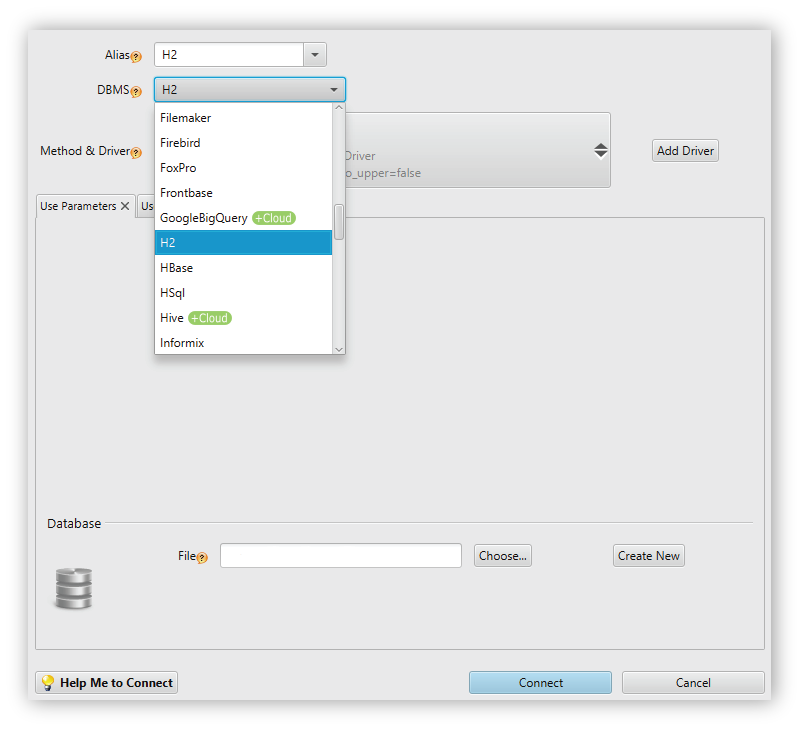
In the connection dialog from above:
- 1
The Alias field is used for naming your database. You can choose whatever name you like, but for this tutorial, we recommend that you stick with H2.
- 2
In the RDBMS field, choose the H2 option.
- 3
In the Method & Driver field, the File driver should be selected. If not, click on the dropdown menu and select File. The driver automatically downloads.
- 4
In the Database section, click on Create new. A new dialogue box will appear, asking you to create a new file for your database.
- 5
After you created the new file, click on Connect.
- 6
A new dialogue box will appear. Make sure Public is selected, and click Ok.
You have created a new H2 database. The next step is to populate the database with tables and data.
CREATE YOUR FIRST TABLE
First of all, what is a table? A database table is where all the data in a relational database is stored. The table is one of the primary components of a relational database.
Each table is made up of columns and rows.
Columns are defined to hold a specific type of data such as numeric, dates or text. Column names can't be duplicated in a table. Every table has a primary key column, that uniquely identifies the data in the table.
- Rows in a table can be zero or more. If a table holds zero rows, then that table is said to be empty. Every row is uniquely identified by a primary key, which can be one or more sets of column values.

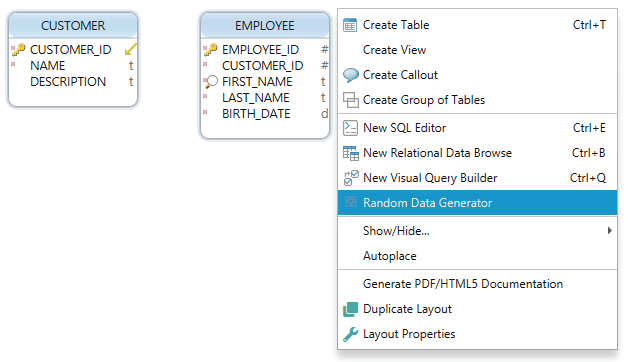
Let's create a table by right-clicking on the layout (the blank space), and selecting Create Table.
*In this tutorial, we will create two tables: "customers" & "employees". Each of the two tables will have several columns.
CUSTOMER Table
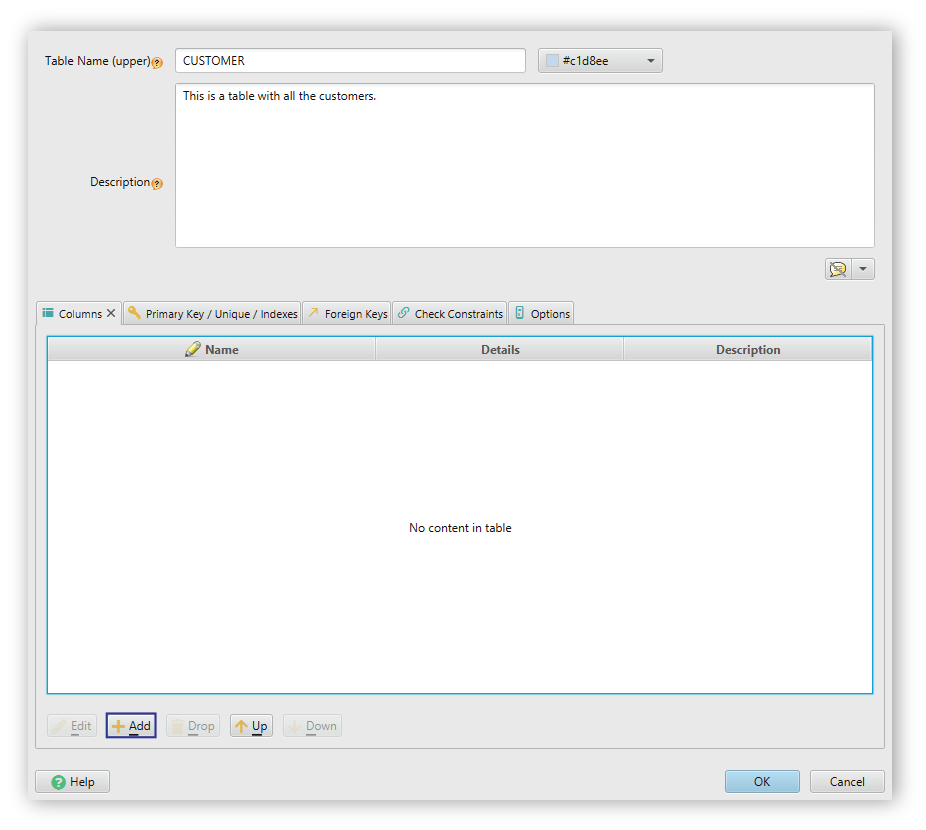
In the new dialog box, insert the name of the table and the optional description. After doing so, you will insert the columns of the table by clicking Add, as shown in the image below.
This CUSTOMER table will have 3 columns:
- CUSTOMER_ID (primary key*)
- NAME
- DESCRIPTION
Primary Key* = the primary key is a special column designated to uniquely identify all table records. Every table must have a primary key column and every primary key column must contain a unique value for every record in that table.
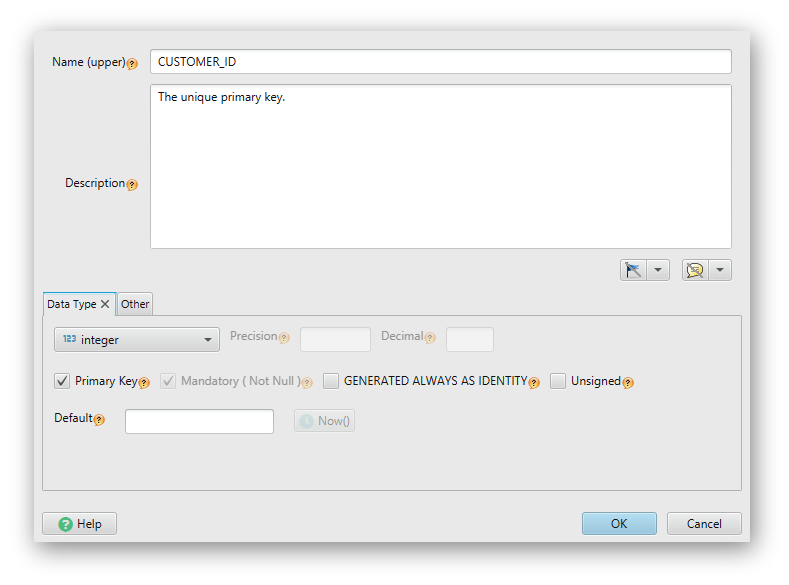
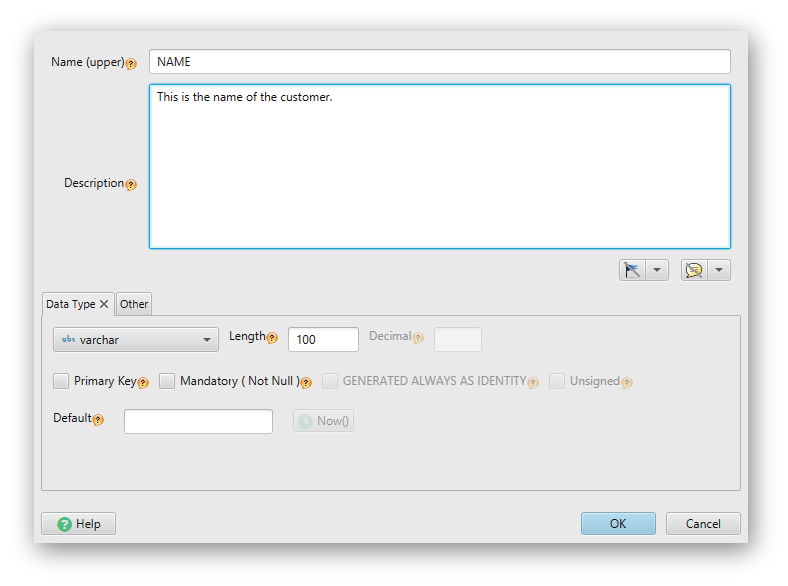
After clicking on Add, the New Column in Table window will appear. We will now create the primary key column, CUSTOMER_ID.
- 1
Insert the name of the column and the optional description.
- 2
In the Data Type section, we'll select integer. This means that the data type in this column will be only numbers.
- 3
Select the Primary Key box.
- 4
Click Ok.
You have created the first column of the table and set the primary key for the contents of the table. The next step will be to create the last two columns. The process is very similar.
- 1
Insert the name of the column and the optional description.
- 2
In the Data Type section, we'll select varchar option. This suggests that the content of the column will be composed of letters.
- 3
Check the Mandatory (Not Null) box.
- 4
Click Ok.
*Mandatory (Not Null) suggests that you can't leave blank cells in the column.
Do the same steps for the DESCRIPTION column, but this time, uncheck the Mandatory (Not Null) box. Click Ok, and you have created the first table of this database.
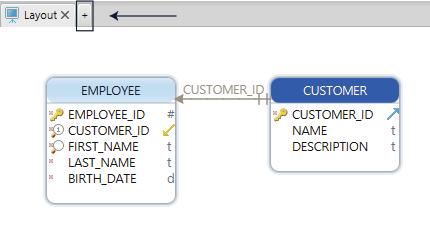
You are now able to see the table on the layout, and it should look like this:
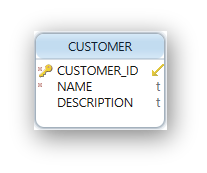
On the left side of the table, the key represents the primary key of the table, and the X represents the mandatory columns of the table.
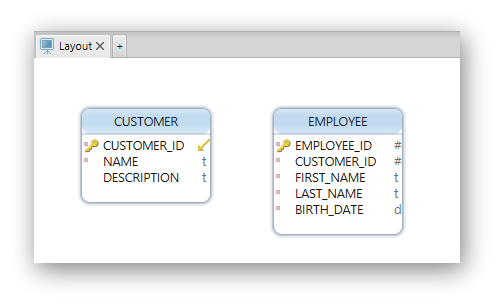
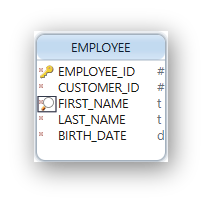
Similar to what we did earlier, create a new table named EMPLOYEES. This table should contain 5 columns:
- EMPLOYEE_ID - Primary Key
- CUSTOMER_ID - Mandatory
- FIRST_NAME - Mandatory
- LAST_NAME - Mandatory
- BIRTH_DATE
After creating the second table, your layout should look like this:
CREATE FOREIGN KEYS
A foreign key is a column or a group of columns in a table. The foreign key acts like a cross-reference between the two tables, because it references the primary key of another table. For every foreign key value of one table, there should be a corresponding value in the linked table.
We want to make sure that every employee has a valid CUSTOMER_ID. For this, we are going to create a foreign key between the CUSTOMER_ID column in the EMPLOYEE table, and the CUSTOMER_ID column in the CUSTOMER table.
To create a new foreign key, drag & drop the CUSTOMER_ID column from EMPLOYEE to the CUSTOMER_ID column from CUSTOMER.
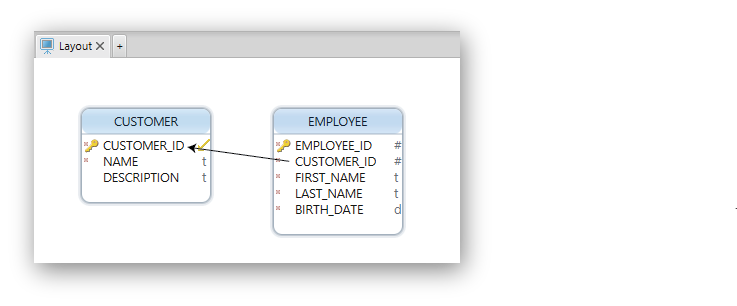
This will open a new dialog box:
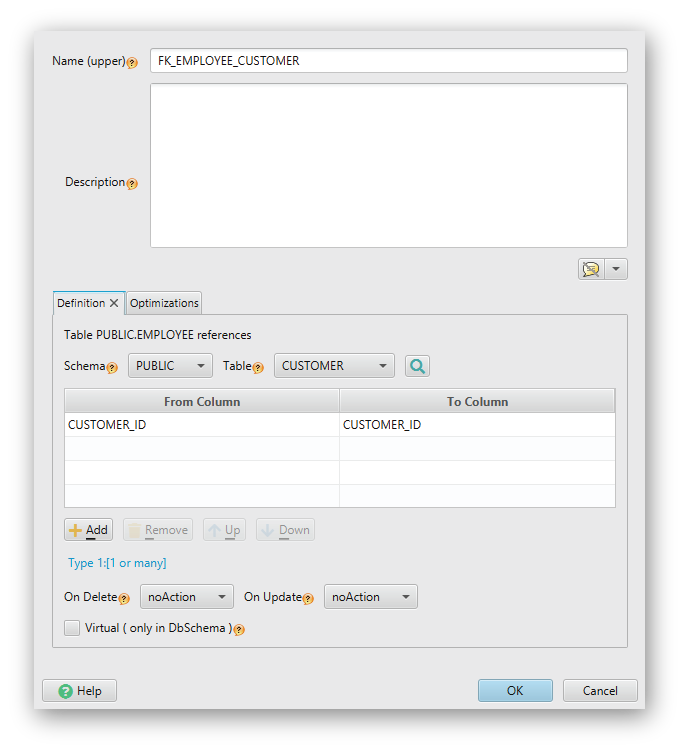
The action was done using drag & drop, therefore Db Schema automatically completed most of the details needed.
In the Definition section, we have to define the two tables and columns that will be connected through the foreign key.
The On Delete and On Update drop-downs, refer to an action taken on a value if a customer is deleted or updated.
There are 4 options for each action:
- No Action - nothing will happen if a customer is deleted or updated;
- Cascade - all employees belonging to a customer will be deleted or updated;
- Restrict - same as No Action;
- Set Null - if customers are deleted, then the employees belonging to the customers will be Set Null, but not deleted.
Virtual means that the foreign key is created only in Db Schema. In this case, no data verification will be done in the database. The virtual foreign key can be used only for design purposes or for relational data editor, which we'll explain later.
INDEXES
What is an Index?
In a relational database, the index is similar to a table of contents in a book. they are both used to fasten
the searching of data. It is a list of values from a column with a reference to the position where they can be found in the column.
For example, consider that we want to select every employee with the name of John. Without indexes, the database
will have to scan all the data before finding every employee named John. This can be time-consuming if the database
contains many entries. But if we have indexes on the FIRST_NAME column, then the database will know where to find all the employees named John without having to scan the whole table.
Indexes duplicate the column data in a separate structure and hold for each distinct value a list of pointers to the table records.
The index is synchronized by the database server each time the column data is modified, inserted or deleted.
How to create an Index?
In this tutorial, we'll create an index for the FIRST_NAME column in the EMPLOYEES table:
- Right-click on the FIRST_NAME column, and select Add Index
- In the new window, you have to insert the basic information about the index. An index can be:
- Normal: which means any value can be stored inside;
- Unique: they don't allow duplicate values. If a value is inserted in a table field, and that value already exists in another field, an error will be displayed.
- Primary Key: : it's the same as unique indexes, plus the condition that the column is mandatory (it does not allow empty values).
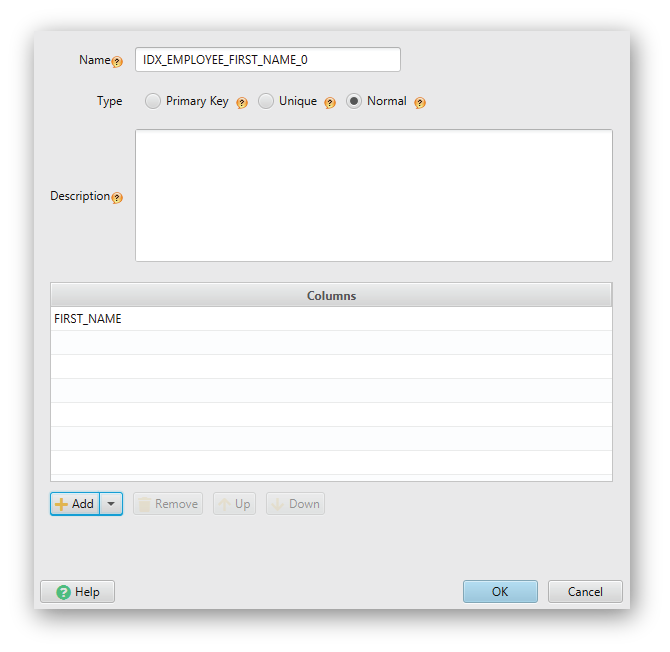
- A magnifying glass will appear on the left side of the table to represent the index.
Indexes require more space and decrease the database performance on inserts and updates, but increase the performance by selects.
In the case of foreign keys with on delete cascade it is recommended to set-up an index in the referring column ( CUSTOMER_ID in EMPLOYEES).
This will fasten the deletion of any customer from the CUSTOMER table.
Queries can use only one index for a table. For example, if you want to search for an employee by FIRST_NAME and LAST_NAME and you have indexes for each of them, only one index will be used.
A solution to this problem is to include two or more columns in the same index, by clicking on the Add button.
GENERATE RANDOM DATA
Now that we have two tables in our database, let's fill the tables with data. For this, we will use Data Generator. A customizable tool built inside DbSchema.
- Access Data Generator by right-clicking on the layout, near the tables.
- In the new dialog box, click on Generate;
- If everything works, the word filled will appear in the Status column.
RELATIONAL DATA EDITOR
DbSchema integrates a dedicated tool (Relational Data Editor) for visualising and editing the data. It is called ‘relational’ because it can explore data from multiple tables based on the foreign keys.
To access Relational Data Editor:
- Right-click on the header of a table and choose New Relational Data Editor. For this tutorial, we'll use the CUSTOMER table
- The editor will open in the lower part of your screen. We can descend in the EMPLOYEES table by pressing the foreign key arrow in the table header.
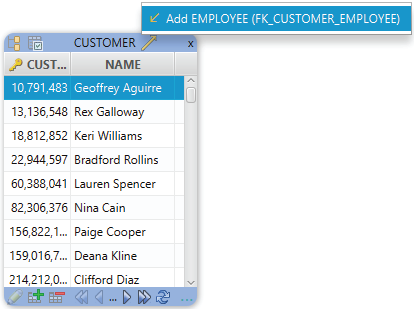
Now we are browsing two tables simultaneously. Selecting a different record in the first editor (CUSTOMER) will refresh the second (EMPLOYEE) with the matching rows based on the foreign key.
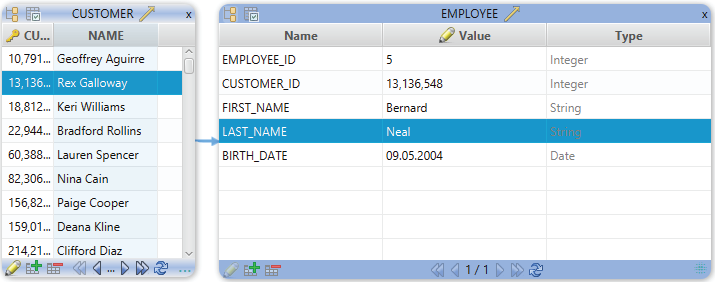
If you want to edit the data from one table, simply double-click on the cell.
DBSCHEMA MODEL FILE
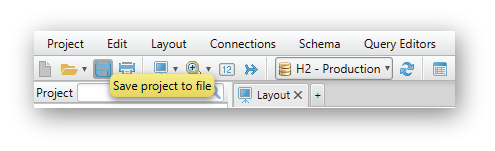
Our work, including the schema, diagrams, SQL Editors and Relational Data Editor can be saved to a file. The file has the extension .dbs.
Next time when you restart DbSchema, the model file will be reopened. If you are working with a dedicated database server and you are in a location where you cannot connect to the database, the model file can still be opened and the diagrams will show.
If you are offline, you can't use Relational Data Editor, as the data from the database cannot be accessed.
SCHEMA SYNCHRONIZATION
The schema visually represents the logical configuration of all or part of a relational database.
Every schema is defined in the database. DbSchema loads this definition locally. If changes are applied in the database while you
are working locally, then the schema defined on your computer will differ from the one in the database. Only by pressing the “Refresh” button you can make sure that both schemas are synchronized.

After you refresh, click on Review Changes. A new window will appear where you can decide what differences to take over in DbSchema internal project or apply in the database.
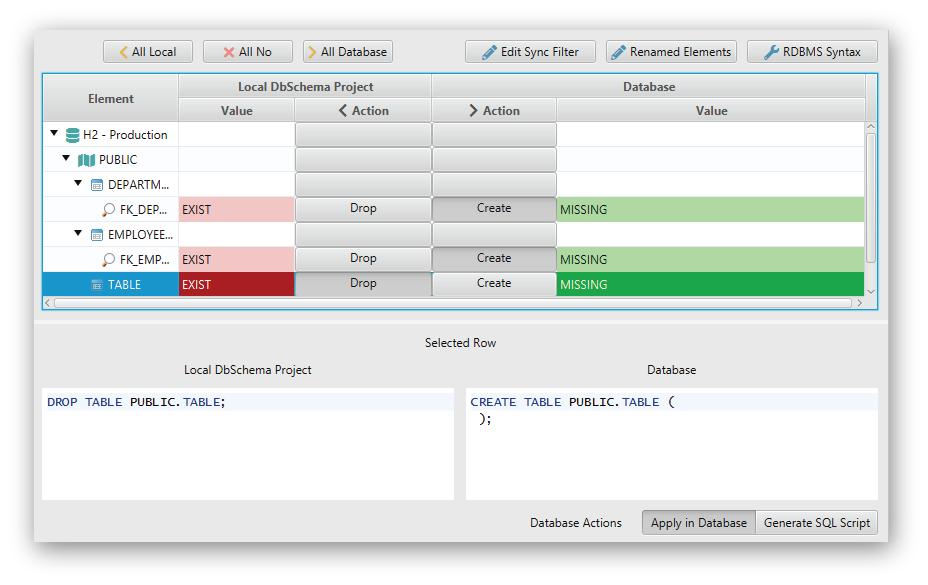
In the Action column, you can choose what differences you want to drop or keep.
DBSCHEMA LAYOUTS
A layout is a diagram and the associated tools opened inside (Relational Data Editor, SQL editor, Query builder, Database reports, etc.). You can create more layouts by clicking the "+" button from the menu.
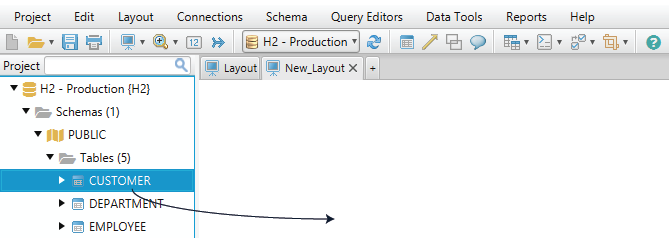
One table may show in multiple layouts or none of them.
A table can be moved from one layout to another using drag & drop, from the dropdown menu on the left.
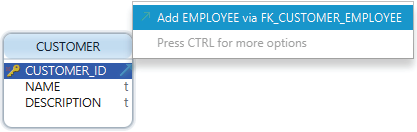
After inserting a table, you can also insert every other connected table by pressing the foreign key button.
HOW TO CREATE A QUERY
A query is a request for data from a table or combination of tables. This data may be returned as SQL (Structured Query Language), pictorials, graphs or complex results. Because we are working with relational databases, we will be using SQL in this tutorial.
To create a query
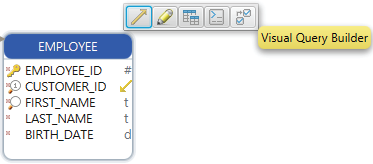
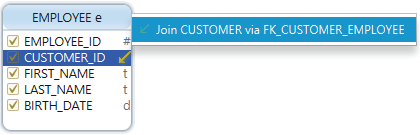
- Start the Query Builder by clicking on the table header
-
The Query Builder will open in the lower part of your screen with the selected table. To add the CUSTOMER table, just click on the foreign key icon.
-
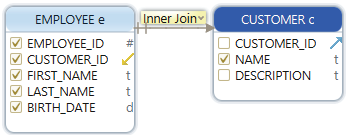
Thick the checkboxes for the columns you want to see in results. In this tutorial, we will execute an Inner Join.
This means that the database will return records that have matching values in both selected tables. We'll detail SQL Joins later on.
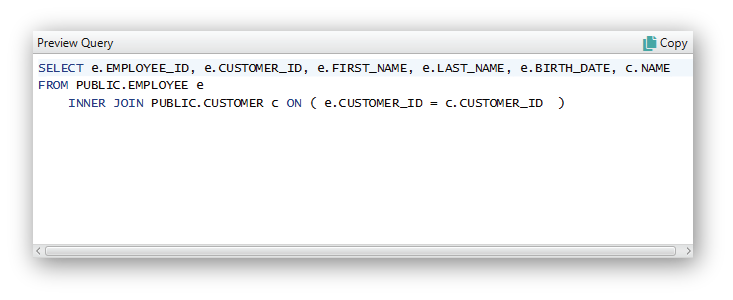
- Click on Run
- The results will be shown under the Visual Query Editor.

JOINS
A join is a clause used to combine two or more tables based on a related column between them (foreign key). In the Visual Query Builder, DbSchema allows you to execute joins visually, without having to write an actual SQL Query.
The Preview Query translates the visual action you’re making, into an SQL Query. For example, in the previous tutorial on how to create a visual query, we created an inner join. You can see in the Preview section, the actual query in SQL language.
There are 4 different types of joins:
- (Inner) Join: This returns records that have matching values in both tables
- Left (Outer) Join: This returns all the records from the left table, and the matched values from the right table
- Right (Outer) Join: This returns all the records from the right table, and the matching values from the left table.
- Full (Outer) Join: Returns all records when there is a match in either left or right table.